Tuesday, October 20, 2009

Scrap Bag Doll Tutorial Part One


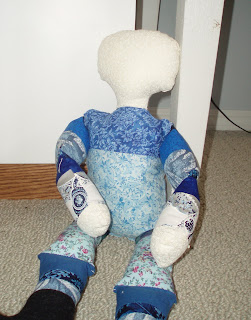
Meet Chantal and Annette. They're made from all kinds of scraps that I just can't bear to discard.Some have been around for a long time. Although it might seem like there are many steps to making this doll, just take them one by one and you'll have your own Scrap Bag Doll in no time. She's 20 inches tall and would make a perfect companion for a little girl.

Here's what you need to get started:

Fabric - naturally! You can use any size or shape of scraps for this project. Piecing the fabric in squares or rectangles will result in a different, but charming look than using strips as I did. I used strips because that's what I had most of in my scrap bag, and I supplemented them with larger rectangles.

When choosing fabrics, go bright or subdued. I collected pieces that went together, but a truly scrap doll could be made by just pulling fabrics without thinking.

Sewing machine
thread
handsewing needle
pins
scissors
measuring tape
scotch tape
fibrefill stuffing
acrylic paints for face
yarn for hair
hook and loop fastening, one (1/2 - 3/4 inch)

patterns - The patterns are in JPeg format and if you click on the patterns they will open and can be printed on an 8 1/2 by 11 inch sheet of paper. A 1/4 inch seam allowance is included on all pattern pieces. They are full sized. Make sure to follow the instructions for putting together the head/body pattern piece. It won't fit on one page, so you'll have to tape it together.

arm pattern


leg pattern


boot/top of head pattern


body/head pattern


Okay, let's get sewing!

Step 1 - Prepare your fabric for cutting.

You will construct separate pieces of fabric for each pattern piece as follows:

For the arm pattern, piece a rectangle 12 inches wide by 8 1/2 inches tall. The bottom 2 inches of the rectangle will be the doll's hands, so you choose whatever skin colour you want.

For the leg pattern, piece a rectangle 12 inches wide by 9 inches tall.

The boot can be solid or pieced. You need about a 9 inch square.

For the head/body construct a square 14 inches wide by 14 inches tall. The top 5 inches will be the head, so again, choose your fabric accordingly. I used wider strips for the body, but narrower ones would work here as well.

To piece your rectangles, place right sides together and stitch a 1/4 inch seam. Keep adding strips until you have the required size. After stitching, press the pieces flat, then fold them in half in preparation for cutting.


Step 2 - Cut the fabric pieces from the patterns.

Cut two of each pattern piece given. Align the hands on the arm piece, and the head on the head/body piece to fit where you want the skin colour to show.


Step 3 - Stitch the arms.

1.  Fold the arms in half, right sides together.

2.  Pin together and stitch, leaving the top of the arm open. Tack or backstitch the beginning and end of the seam.

3.  Clip the curves of the seam allowance in the hand section. Take care not to clip into the seam itself. Clipping allows for a smoother curve.

4.  Turn right side out.


Step 4 - Stuff the arms.

1.  Begin stuffing the arms, pushing the stuffing firmly into the hand section. Use a pencil or other long object to make sure the stuffing gets into all the curves. Stuff up to the line indicated on the pattern, about halfway up the arm.

2.  Stitch across the arm with the sewing machine, backstitching to fasten threads securely at beginning and end. This stitching will be visible. You will stitch from the seam to the opposite fold.

3.  Continue to stuff the arms, leaving about 1/2 inch unstuffed at the top.


4.  I like to take a small pleat at the top of the arm. It makes the arm rounder and less splayed at the shoulder. This is an optional step. I pleated the center about 3/8 inch. Pin and then stitch the arm closed.

Set the arms aside.
 

Step 5 - Stitch the boot to the leg.

Right sides together, stitch the boot to the leg rectangle.


Step 6 - Stitch the legs.

1.  Fold the leg and boot piece right sides together and pin.

2.  Stitch, leaving the top leg open. Backstitch to secure threads.

3.  Clip the curves around the boots, and then turn right side out.


Step 7 - Stuff the legs.

1. Stuff the leg as you did the arms, using a long tool to ensure that the boot portion is firmly stuffed. Stuff to the knee line indicated on the pattern.

2.  When you stitch across the knee-line, make sure that the boot toes are pointed upwards. The leg seam will be in the center front of the leg, unlike the arm, which has the seam on one side. This ensures that the doll's toes point forwards and not sideways. I've done it both ways and while the doll with outward pointing toes has her own charm, I prefer forward pointing toes. You can choose.

3.  Continue to stuff the legs as you did the arms, leaving about 1/2 inch unstuffed at the top. Form a small pleat and stitch the leg closed.

Set the legs aside.


Step 8 - Stitch the head and body.

1.  Pin the head/body pieces right sides together.

2.  Stitch, leaving open between Xs as indicated on the pattern. Clip the curves, particularly around the neck.

3.  Turn right side out.


Step 9 - Attach the arms to the doll body.

1.  Insert the arms into the openings. Pin carefully, making sure that the edges of the body openings are turned under.

2. Stitch closed. This stitching will be visible. I found it helpful to stitch once from each side of the doll. This ensures that all seams will be firmly stitched closed. Clip threads.


Step 10 - Stuff the head and body.

1.  Begin stuffing the head. Again, use a long tool to very firmly stuff the had, particularly in the neck area. This will make the neck firm and less wobbly.

2.  Stuff the body, leaving about 1/2 inch at the bottom unstuffed.


Step 11 - Attach the legs to the doll's body.

1. Insert the legs into the body openings. If you have chosen one side of the body to be the front, make certain that the legs point in the correct direction. Pin the legs to the body carefully, ensuring that the edges of the body openings are turned under.

2.  Stitch closed. This stitching will be visible. As with the arms, I find it helpful to stitch once from the front and once from the back side. Clip threads.


VoilĂ ! You have a completed doll body.

Now to add the finishing touches. Instructions are found in this post for the hair, face and pinafore.

SewMamaSew has many great scrap buster projects being featured this month. Visit their site for a way to lower the piles of fabrics you have stashed away.


Scrap Bag Doll Tutorial Part Two

Click here for the first part of the tutorial.


Carrying on...we'll give our bald doll some hair and a face, and make a pinafore for her to wear.

Step 1 - Make a doll wig (I used a process found here to make the wig and added a few helpful hints that I discovered as I went along.) This site has excellent diagrams. I couldn't find a way to contact the owner to give her credit, but she has done an excellent job. There are many different ways to make doll hair so choose whichever suits you.


1. Fasten a measuring tape (or use a long steady ruler) to a counter top. You will need to mark 20 inches for the length of the doll's hair. At the center (10 inches), place a 6 inch piece of tape, sticky side up. Tape this down to the table so it doesn't move around when you start laying the hair onto it. All this taping will save you no end of frustration in a few moments.

2.  Begin laying strands of yarn across the tape. Don't stretch the yarn too much and don't worry about cutting the ends now. They can be cut and evened out later. Stretching the yarn will result in a wig that might be shorter than you had planned. Keep the strands from crossing over each other. Lay down 5 inches of closely packed strands onto the tape.

3.  When you have finished, lay a strip of paper, about 2 inches wide over the tape (the center of the hair). Gently lift the taped yarn off the counter and turn over. The paper will help to support the yarn. Now the tape will be on top, with the sticky side down, against the paper (and the yarn).

4.  Stitch, with your machine, down the center of the tape.

5.  Remove the tape and the paper. I found it easier to fold the paper up against the stitching first, then to tear it gently off one side, then the other. The tape might come off in pieces and a pair of tweezers will help get it all off.

Step 2 - Stitch the hair to the doll's head.

1.  Draw a line, using a pencil, from about 3/4 inch in front of the head seam, down the back of the head almost to the neck.

2.  Lay the wig on this line and begin stitching the hair to the head. Use a back stitch and a doubled strand of sewing thread. Begin at the front and stitch down along the center, just to one side of the machine stitching, then back up the other side.

3.  Arrange the hair, not allowing the strands to cross, about 1 1/2 inches to 2 inches away from the center part, and stitch another row of backstitch to fasten the hair on the sides of the head. Slightly angle the line of stitching towards the back center.

4.  Divide the hair into three strands and braid, tying the braided end with another strand of yarn in a double knot. You can add a decorative ribbon bow later.

5.  Trim the ends of the braid.


Step 3 - Paint the face.

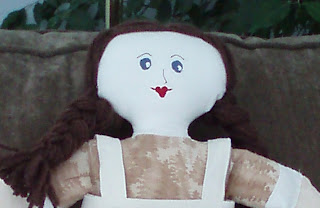
Using acrylic paints and a fine permanent ink drawing pen, follow the photograph to paint the doll's face. I painted two circles for the eyes, then dotted them each with white. The eyebrow and nose line were drawn with a .3 micron pen. For the mouth, I placed three dots to form a heart-shape (two at the top and one below), then painted a line out from each side.

Step 4 - Stitch the doll's pinafore.

1.  Cut the following pieces from fabric:
        - one piece 22 x 8 inches for the pinafore skirt
        - 2 strips 2 x 13.5 inches for the pinafore band and facing
        - 1 - 10 inch x 1 1/2 inch piece for the straps (you will construct them in a single piece, then cut them in half.

2.  Press in 1/4 inch to the wrong side on each long side of the strap.


3.  Fold the pressed edges to the center and press.


4.  Stitch the edges closed, very close to the edge, then stitch along the fold on the other side of the strap. Cut the strap in half. You will have two 5 inch pieces.

5.  Press one long edge of one of the pinafore bands 1/4 inch to the wrong side. This will form the facing.


6. Measure to find the center front of the band. An easy way to do this is to just fold it in half. Mark the center with a pin.


7.  Pin the straps 1 1/2 inch to the right side of either side of the center front.


8.  Take the other end of the strap and pin it 2 1/2 inches from the front center. Make sure that the straps are not twisted. Stitch to hold in place.


9.  Pin the unpressed long edge of the second band (the facing) to the top edge of the band, over the straps. Stitch.


10.  Press the two short sides and one long side of the skirt 1/4 inch to the wrong side, then fold over and press another 1/4 inch to fully enclose the raw edges. Stitch.

11.  Set your machine to a long stitch length. I just turn my dial to the maximum length. Stitch two rows of stitching close together 1/4 inch and 3/8 inch along the top of the unfinished edge. Do not fasten your threads at the beginning or at the end and be sure to leave thread tails. Take care to not cross your stitching.

12.  Gather your fabric by pulling the two bobbin threads (the bottom threads) gently.  Pull threads until the skirt fits the band, leaving 1 inch of the band free at either end.


13.  Pin the right side of the skirt to the right side of the unpressed pinafore band, adjusting gathers to fit evenly, making sure that you leave 1 inch of the band free at either end.


14.  Stitch the gathered skirt to the band. Remove the basting (gathering) threads. Press the band and the seam allowance up towards the band.


15.  Stitch across the short ends of the band and band facing. Clip the corners diagonally.

16.  Turn the band facing to the wrong side. Press over the seam, enclosing the seam in the band.


17.  Pin the folded edge of the band facing over the skirt and band seam, enclosing the raw edges of the seam inside the band. Hand baste, then stitch with your machine from the right side. I find that basting helps to ensure that all the edges are properly caught.

18.  Fasten a dot of hook and loop fastener at the back edges of the band. Place the pinafore on the doll to mark the correct fit. Although I use self-adhesive dots, I find the self-adhesive is ineffective and so I use Velcro glue to ensure a firm adhesion.

You're finished! I hope you enjoy making your scrap bag doll. I'd love to have you link back to this post, or comment so that I can see your creation as well. If you have any questions, please email.

Monday, October 19, 2009

Two Weekend Walks

Rain dripped all day Saturday. It was so dark it felt like mid-winter. In the afternoon the skies cleared up a little, so I grabbed my umbrella and my camera and headed out for the bog. Rithet's Bog is a preserved piece of history in Saanich and is surrounded by a trail that wanders through trees, blackberry brambles, across a small creek and along a bit of open water. It's one of my favourite places to walk.

I was glad for my umbrella - it soon started raining. There's not a lot of open water, but people like to come and sit on the benches and watch the ducks and wild geese that frequent this bog. No birds were in view today, they were all huddled somewhere keeping out of the drizzle.

Raindrops making ripples in the water that reach out to each other, connect and then disappear, only to be replaced by more ripples. The bog was quiet except for the sound of rain on my umbrella. Under the trees, I moved the umbrella away from my head and heard the sound of thousands of raindrops falling through the trees - beautiful and ethereal.


On Sunday afternoon the sun shone and we went for a short walk with friends after church to Tod Inlet. Here, light filters through golden trees onto the leaf-hidden forest floor.


 On the incoming tide evergreens stand upsidedown. Almost bare branches droop over the water in skeletal beauty.


 And here we are, squinting into the autumn sunshine, surrounded by nature's glory.


Posted by Picasa

Friday, October 16, 2009

Projects On the Go

I've been busy lately, mostly with studies. I have an Anthropology mid-term coming up next Tuesday and the amount of material that needs to be in my little brain is staggering. I also have a craft fair coming up on the 24th - one week from tomorrow. I have quite a lot of things that are half or three-quarters finished, but lacking the final touches. These felted flower pins are one example. I like to do some handwork for an hour or two in the evening before heading for bed. It calms me down and lets all those dates and archaeological sites settle into the folds of my brain. I have a mishmash of items for the craft fair, most are using recycled items - like felted wool sweaters for these pins.
I'm really enjoying handstitching books together. I sat in front of the fire last night and stitched these three. Now to embellish the covers a little. I used old hardcover books for the covers and some wonderfully toothy Arches paper for the signatures.

And another recycled sweater item - felted wool coasters. I felted a couple of sweaters that turned into such thick cloth that it's not suitable for machine stitching. I had planned to make pillows out of them, but these will become coasters. Kind of Christmassy, don't you think?

Now, back to the books for an hour or so before heading out to get a much needed haircut.
Posted by Picasa

Wednesday, October 14, 2009

Thanksgiving Table Setting


Canadian Thanksgiving always falls on the second Monday of October. Monday is our actual Thanksgiving Day, but turkey dinners are enjoyed on any day throughout the long weekend.
This year, we had ours on Saturday night, to accommodate everyone's schedule.

I'm not a real fan of oranges and browns, so a couple of years ago I found this aubergine coloured tablecloth fabric and bought a length for our fall table. The centerpiece always has to be minimal, according to the man I married, because it's the food that is supposed to sit on the table. So a few miniature pumpkins, some dried and curling autumn leaves, candles and smooth stones decoupaged with words of things for which to give thanks comprised our centerpiece. I also used the stones as place cards, cutting letters out of magazines to form the names of all those who sat around the table.


And oh, what a lovely time we had. Surrounded by good food, laughter and the love of family - our hearts were full and the memories linger like warm chocolate puddles in my mind.

We enjoyed:

Salad greens with roasted cherry tomatoes
and crispy fried sage leaves

Turkey
Stuffing
Mashed Potatoes
Gravy
Yams with a pecan/brown sugar crust and a hint of orange
Paprika crumbed broccoli
Cranberry sauce

Pumpkin Cheesecake

Want to see more wonderful table settings? Visit Susan at Between Naps on the Porch for a weekly dose of inspiration.
Posted by Picasa

Sunday, October 11, 2009

A Wonderful Thanksgiving

We had a wonderful evening. Lots of laughter, brilliant conversation mixed with pure silliness, good food, and the warmth of being together. It was one of those times that leaves me feeling contented and satisfied.


This has been a hard year - well the past 5 months have been hard. Some days, it would be easy to concentrate on what's not quite right in our world. There is, at times, a deep sadness that engulfs Tim and me. But we remind each other that we have much for which to give thanks. And I remember that sometimes, according what David said in the Psalms, thanksgiving can be a sacrifice - it can cost something to be thankful. I'm so glad he wrote that. A few weeks ago the deep sadness came over me again. I drove down to the beach and took a walk along the shore. I noticed the stones lying there and began picking up some that appealed to me, in colour or shape. Soon I had a pocket full.

I brought them home wondering what I could do with them. And I thought of making a collection of things I was thankful for. I cut letters and words from old magazines and applied them to the rocks with ModPodge. Then I glued individual letters spelling out the names of the people who would sit around our table, and used them as place markers.


After dinner last night, I collected all the stones in a wooden dish and placed them on my coffee table. They are there as a visible reminder to give thanks, that no matter how tough the day might be, I can be thankful to God for something, for many things.


In the end, it's the people around my table who matter most, and those who are far away but part of my family. Love and family - I am richly blessed with these.
Posted by Picasa

Friday, October 09, 2009

Everyday is Beautiful


I've been going for long walks every afternoon before I make dinner. After studying all day, I need a break and since the weather is so gorgeous, outside is where I want to be. The fall colours are beginning. We don't have the stunning colours of the eastern part of the continent, but there is enough to satisfy me.


Fall touches in my home bring some of that crisp ambiance indoors. I like to keep things simple. The above arrangement is in the dining room, where this weekend we'll be having turkey, stuffing and all the trimmings.


When I'm in the living room, reading, sewing, or knitting, or even just watching television in the evening, I like to light a candle. This brass bowl is from Ecuador and I bring it out in the fall so I can enjoy its rich warmth.

Today I'm cleaning house and getting ready for our Thanksgiving dinner. We're having it on Saturday night so as not to conflict with in-law dinners. Really, it doesn't matter when we celebrate - it's being together that counts.
Posted by Picasa

Tuesday, October 06, 2009

A Tuesday Poem and a Memory


A chilly night. Come morning, snuggled in my bed in the darkness, I'm thankful for the prospect of a warming cup of tea, a light sweater, and my little electric heater beside me as I study (and blog). Using the heater means we don't have to heat the entire house yet.

We lived in Ecuador, South America for many years. There were no seasons to speak of, and I missed them dreadfully - probably autumn most of all. One year we returned to Canada while my husband studied for his master's degree. I was SO COLD! The damp found its way into my bones and stayed there. One day my grandmother showed up at my door with a gift - a small electric heater. I used it constantly that winter. It sat beside me when I sewed or read. When we returned to Ecuador, I left it packed up in our boxes wondering when I would ever use it again.

Seven years ago we returned to Canada and that same heater has been in use every autumn and winter. It sits beside me now, blowing its gentle warmth. My grandmother has been in heaven for a year and a half, but I think of her when I see my heater and I remember her love for me, her thoughtfulness and her prayers.


At Blackwater Pond the tossed waters have
settled
after a night of rain.
I dip my cupped hands. I drink
a long time. It tastes
like stone, leaves, fire. It falls cold
into my body, waking the bones. I hear them
deep inside me, whispering
oh what is that beautiful thing
that just happened?

Mary Oliver
Posted by Picasa

Monday, October 05, 2009

Finally Finished Handwarmers


I started knitting last fall/winter. I made a couple of scarves for family members, a pair of handwarmers for my daughter, and started another pair for my niece. Then spring came, the temperatures warmed up and summer followed. The knitting was put away and replaced with gardening. Last week I pulled out my knitting bag and discovered that just a few rows remained to finish this pair of handwarmers. So I sat down and finished them. Here's my niece modeling her cozy handwarmers. She's a music student at our university and says they will come in very handy - she can even wear them while playing her trumpet! So, although our autumn days are full of lingering warmth and sunshine, colder days will come, and she will be ready for them.
Posted by Picasa

Saturday, October 03, 2009

Monograms

I've always loved the idea of monograms - embroidered in white thread on white sheets, pillowcases, napkins and tablecloths - or front and center on a piece of thick stationery - or on note cards - or stenciled on a wall.

Well, thanks to Cathe at Just Something I Made, I now have my very own personal monograms to use in a kazillion ways. She had a giveaway and I won! Yippee! Thank you, Cathe. And without further ado...here are my monograms....


Aren't they lovely? Cathe collects vintage monograms and goes through them to find the initials required. Sometimes she combines vintage monograms to get the initials she wants. If you check out her blog, you'll see what you can do with monograms, and lots of other wonderful stuff Cathe is up to. She's a very creative lady.

Friday Favourites: Here and There

  The deep rasping caw of a crow high in a treetop sounded like autumn this morning. When I walk into the garden I cringe at the invisible s...