Thursday, July 30, 2009

Beauty in the Commonplace


I do love this quotation. It reminds me to look for beauty in the little things of everyday. Right now, it's so hot I can hardly think, but I can hear my neighbour's water fountain trickling coolness in the evening. Cold soups have become a staple for dinner. I make one in the morning and it sits, melding flavours beautifully and getting cold in the refrigerator all day.

Last night we went to the lake. I swam and swam until I had goosebumps. We were in the water for over an hour, floating on tubes, or swimming lazily and chatting.

And last night we slept outdoors again. I was awake for a long time - I forgot that the iced tea I made was caffeinated - oh dear. But I lay and looked at the stars and saw two more shooting stars. Now, I have to ask myself, are there always this many? And why don't I see them? Then I realized - I'm usually in my room at midnight, not laying outside looking up at the sky. And it made me think - how many more wonders are out there that I don't even notice, because I'm not looking. It's a reminder to me to keep my eyes open no matter where I am.
Posted by Picasa

Wednesday, July 29, 2009

Our outside bedroom


Victoria, and much of the west coast of the USA and Canada are in the midst of a heat wave. Record-breaking temperatures all around. Last night it was just too hot to sleep in the house, so outside we went. A corner of our deck is somewhat private and we set up our camping air mattress and settled in.

Listening to the noises of the city - and the neighbor's trickling water fountain took awhile to get used to. We watched the stars and just as I turned over to go to sleep - oh, a shooting star blazed across the sky. I think we'll be out here again tonight.
Posted by Picasa

Tuesday, July 28, 2009

Hot, Hotter, Hottest

Western Canada is undergoing a heat wave! I'm loving it - until about 10:30 pm when it's time for bed. Heat like this is so rare in Victoria that practically no one has air conditioning. We do have a fan in our bedroom, but last night, even that air felt warm.
Meanwhile, during the days I'll enjoy the flowers in the yard and the fact that I can just about SEE my garden grow - the tomatoes, cucumbers, and zucchini are soaking up this lovely warmth.

Evening shadows on my potting bench. A birdhouse constructed by my son, painted by me years ago, some driftwood from the beach and a heart-shaped rock found in my garden.
Posted by Picasa

Sunday, July 26, 2009

Bag Pattern - A Summery Bag


This handbag pattern is one I've had in mind for awhile. I spent a pleasant afternoon stitching and ended up with something fresh and cheerful for summer. The bag is 12 inches wide and 9 inches tall, plus the handles. It's large enough to hold a paperback book, a water bottle and the essentials of wallet, comb and lipstick. There are two pockets on the outsides - I love having easily accessible pockets for my keys and sunglasses.

Piping along the tops of the pockets and the bag adds a crisp finishing touch.

I took pictures as I went along, and wrote down the steps so that someday I can make this purse again, and I decided to share them.

Summer Handbag Tutorial

1. Gather your supplies.
1/2 yard (or so) of fabric (I used a decorator cotton print)
1/2 yard of heavy interfacing (fusible or sew-in)
1/2 yard of lining (I used a cotton broadcloth because that's what I had on hand)
matching thread
paper to make pattern (or mark directly on the fabric)
handles
hardware to attach handles to purse
1 package of cotton piping


these are the handles and the hardware I chose

2. Cut patterns as indicated. Place the bottom of the bag on a fold on the fabric, the lining and the interfacing. Cut 2 pockets. Cut one strip for handle loops.


the sides are slightly angled


fabric, interfacing and lining
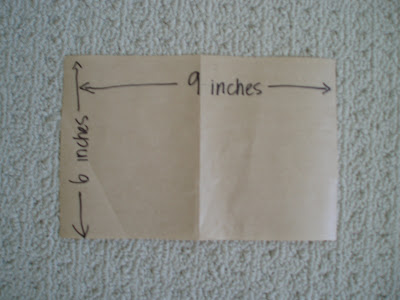

pocket pattern


I chose not to line the pockets, but it's an option

handle loops

3. Apply piping to the top of the right sides of the pockets. Use a zipper foot and stitch close to the piping. Press piping up.


4. Press 1/4 inch to the wrong side of the 3 remaining unpiped edges of the pockets. Fold pockets in half and mark the center top and bottom with pins.


5. Unfold fabric bag. Mark centers with pins. Pin pockets 2 1/2 inches from the top edge of the bag, with the wrong side of the pocket against the right side of the bag. Match the pinned centers. Edgestitch pocket to bag (stitch close to folded edge.) Backstitch at beginning and end.


6. Pin and baste sew-in interfacing to wrong side of bag body. Or, fuse, if using fusible interfacing.


7. Fold bag right sides together, matching edges. Stitch a 3/8 inch seam from top to bottom on each side seam.

8. Box the bottom of the bag. Match the side seam you just stitched to the center fold of the bag bottom. You will end up with a triangular point. Measure down 1 1/2 inches from the point, along the seam line, then draw a line perpendicular to the seam. Stitch across this line. Repeat for the other corner of the bag. This results in a flat bottom. If you don't want a flat bottomed bag, omit this step.


9. Press all seams flat - as much as possible.

10. Apply piping to the top of the bag, again using a zipper foot. Begin at one side seam and taper the ends of the piping down into the seam allowance.


11. Press handle loop strip in 1/4 inch on each long edge. Fold edge in half and press together. Stitch down the center of the strip. Cut strip into 4 - 2 1/2 inch pieces. You will have a bit leftover - just discard.

12. Mark top centers of bag with pins. Measure the distance between the handles you've chosen and divide that measurement in half. The handles I chose were 5 1/2 inches wide, so I marked half of that distance on either side of the center mark (2 3/4 inches from the center.)


measuring the handle


13. Fold loops in half. Pin the loops to the inside of the bag at the marks on either side of the center. Match the bottoms of the loops to the bottom of the piping. Stitch close to the piping, using a lower gear to get through all the layers, if your sewing machine has one.


The bag is nearly completed - you just need to add the lining.

14. Fold the lining fabric in half, right sides together and stitch the side seams. Box the bottom in the same way you did the top. Press all seams flat.


15. Press 3/8 inch to the wrong side of the top of the lining.

16. Insert the lining into the bag, wrong sides together. Pin the lining to the top of the bag, just underneath the piping. The scissors in the bottom of the bag in this photo were just to provide weight so it would stand up.


17. I like to handbaste the lining in at this point. I find that basting now makes the stitching later neater and easier to handle.

18. Top stitch along the top edge of the bag, just under the piping, making sure to catch in the lining fold on the wrong side. Again, use a zipper foot to allow you to get close to the piping. Stitch again, 1/4 inch below the first stitching, if you like.


19. To prevent the lining from pulling loose from the bottom of the bag, I tack it with handstitches along the box seams. I begin inside the bag and come up in the seam. The stitches are hidden by the seam that forms the box.


20. Attach the handles as per the instructions on the package.


Enjoy your summery new bag!

If you make this bag, I'd love to hear from you and see any photos you might have. Also, if you have trouble with the tutorial, please let me know. I'd be happy to answer any questions.

Saturday, July 25, 2009

Ways with Flowers


One thing I love about summertime is the luxury of having fresh flowers from my very own yard to cut and arrange. I spent a happy hour or two this week arranging flowers for several rooms in preparation for a visit from my cousin and her family.


I don't know why this photo insists on being off to the side, but it's stubborn and I can't move so... It's not the greatest photo but I took it because it illustrates my point of this post. You can see that the flowers are in a glass jar which is smaller than the vase itself. I found this round vase at Michael's and put the flower filled jar inside, held the jar firmly in the center, and inserted seashells all around it. In the past I've used paper items - music paper or whatever. Being separated from the jar with the flowers means that nothing else gets wet.

This wicker basket is also filled with jars, which in turn are filled with water and beautiful hydrangeas. Combining water with "un-waterproof" items is a fun way to add texture to flower arrangements.
Posted by Picasa

Wednesday, July 22, 2009

32 Years of Pink Roses

Today is our 32nd wedding anniversary. My that sounds like a long time - makes me think I should be more grown up and older than I feel. I carried pink roses in my bouquet and they have always been my favourite colour of roses. Life has not been strewn with pink roses - we've had ups and downs but I have never regretted marrying Tim and am so thankful for the years we have had together. I hope we have at least another 32!

We have overnight guests staying with us tonight and I'll be making dinner for them. So Tim and I will celebrate on Friday. It will be low key, but fun just to be together.

(edited to add: I pushed publish before changing the post option date - our anniversary is the 23rd, not the 22nd)

Tuesday, July 21, 2009

Blues and Greens

A couple of hours upstairs using the sewing machine and then an hour or two of sitting on the deck handstitching seemed like a pleasant way to spend an afternoon.

And the result...a patchy pad for an underused bench on the patio. This has been in my mind for some time and I decided to just do it one day without overthinking it. I grabbed blue and green fabrics from my stash (which I'm trying to whittle down), used my rotary cutter to make strips of varying widths, and stitched them together in one long piece. I tried to not spend too much time planning which fabrics looked best next to each other, but I did make sure the fabrics were evenly distributed.

This bench is about 6 feet long, or 7 or 8 (I'm too lazy to go down and measure it, but I know my 6 foot husband can stretch his length along it). I used two layers of cotton batting in the middle and some leftover white quilted fabric for the backing. I wasn't planning on doing any handquilting. The binding was leftover strips cut to 3 1/2 inches, stitched together, pressed in half wrong sides together and machine stitched to the right side of the pad, then turned over and handstitched to the other side (a french binding), able to withstand some wear and tear because of the double thickness.


I remember a saying from my childhood, "Blue and green should never be seen, except in a washing machine." I think it was an old time rule for not wearing the two colours together. I personally think they look great together and I'm pretty sure God agrees with me considering all hydrangeas, irises, forget-me-nots, delphiniums, and a host of other green and blue combinations.

It was fun to spend a little time stitching. I haven't done as much as I would have liked recently. I'm working on another course - it's my "summer school." I have one paper left and the exam so it's getting close to being finished. I'm thinking my next project might be some patchwork pillows in the same blues and greens.
Posted by Picasa

Monday, July 20, 2009

One more post about Versailles

During the spring Joy of Cupids Charm contacted me about translating an old document listing some of Marie Antoinette's jewelry from French into English. I enjoyed the work - it was more pleasure than anything else. In return, she sent me the beautifully worked necklace I'm wearing, with the Chateau de Versailles in the background.

Here's a close up of the necklace - each charm features a different portrait of Marie Antoinette. Today, Joy has posted some of my photos on HER blog - go take a look, and check out her beautiful work.

Thursday, July 16, 2009

Summer Tablescape

It's so easy to have a pretty table in the summertime with all the fresh flowers everywhere. My daughter put this arrangement together as she wandered around the yard, clippers in one hand and the vase in the other.

I tend to use just one or two flowers, but I love the loose and casual arrangement she made with at least 6 kinds of plant material.

Dinner on the patio - perfect summertime.

For more wonderful tablesetting ideas, visit Susan at Between Naps on the Porch.
Posted by Picasa

Tuesday, July 14, 2009

Visit to Butchart Gardens

On Friday a good friend invited me for a stroll in Butchart Gardens. We are so fortunate to live just 20 minutes away from these famous gardens. I love visiting them year round. No matter what time of year, there is always something to admire. The begonias were amazing - huge and colourful. They are in the ground and also hang in baskets under an arbour created just for them and the fuschias.

The sunken gardens were created by Jennie Butchart from the old quarry where her husband made his fortune. Standing at the top of the stairs I always admire the winding paths, the artfully laid out beds and the wonderful patterns created by flowers, shrubs and trees.

The combination of texture and colour never ceases to amaze me. It's such a peaceful place to be - if you get there early enough. On a summer afternoon the crowds are intense, but we went at opening time, 9 am, and enjoyed the quieter atmosphere.

The dahlias are just starting to bloom. There are so many gorgeous colours and shapes and sizes - some are enormous - dinnerplate dahlias they are called, and they are just as big, or bigger than a dinner plate. I prefer these smaller ones, still stunning in their spikey form.

The rose gardens, with tall delphiniums in the background, are one of my favourite places. The roses tumble over arbours and metal structures like the one above, or they stand proudly as individual bushes.

Their colour and form are stunning. And I like the way the garden has the roses all labeled. You would think I would remember the name of this rose, but sadly, I don't.

The old Butchart home is now offices and a restaurant. The windows are shaded by charming awnings and beautiful flower boxes add their colour.

If you ever come to Victoria, visiting Butchart Gardens should be on your list of sites to see!
Posted by Picasa

Life These Days

  I only listen to the radio while driving. Occasionally I'll sit in the driveway for a few moments to finish a segment. Last Saturday I...